AMP for WordPressプラグインを未導入の方はこの記事の前にWordPressにAMPを導入する記事をご参照下さい。
https://ureshi-design.com/2018/07/02/amp-for-wordpress/
この記事ではAMP for WordPressプラグインでAMPを導入した場合のAMP自動広告の設置方法を書きます。
AMP自動広告設置の手順
- Google AdSense管理画面でAMP自動広告をオンにする
- functions.phpにコードを追加する
目次
AdSenseホーム画面でAMP自動広告をオンにする
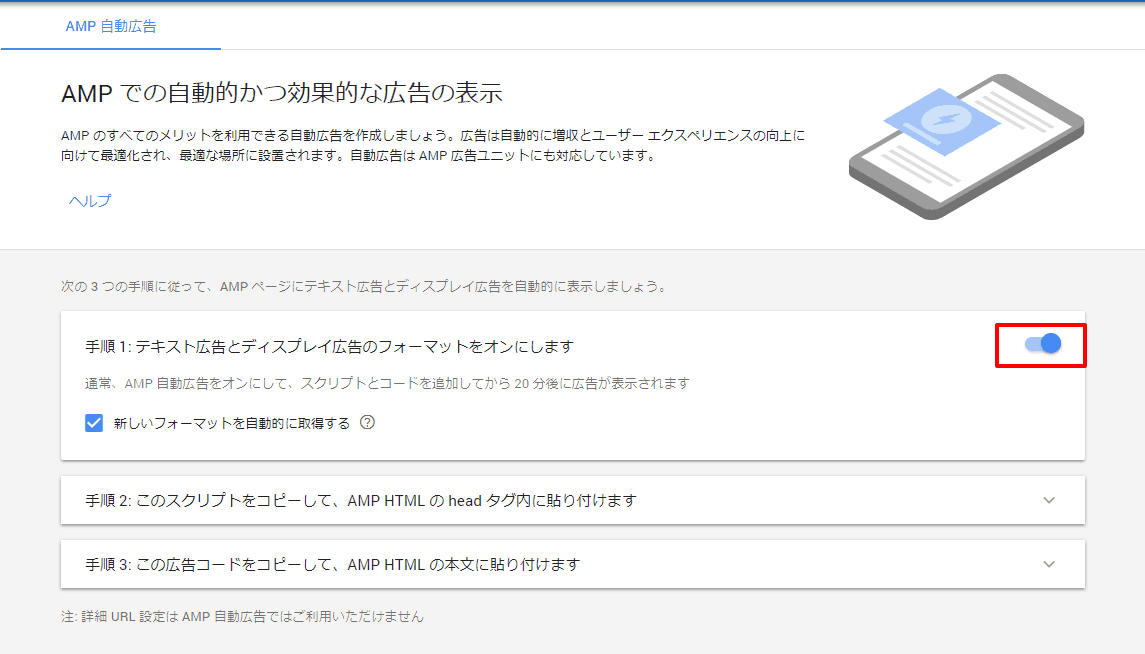
AdSenseホーム画面>広告の設定>自動広告からAMP自動広告「: テキスト広告とディスプレイ広告のフォーマット」をオンにします。

functions.phpにコードを追加する
以下のコードをfunctions.phpに追加し、手順2・3のAMP HTMLのheadと本文に必要なコードを挿入します。
functions.php
//amp-auto-ads-JS追加
add_action( 'amp_post_template_head', 'xyz_amp_add_tag_adsense_js' );
function xyz_amp_add_tag_adsense_js() {
?>
<!-- AMP auto ad js -->
<script async custom-element="amp-auto-ads"
        src="https://cdn.ampproject.org/v0/amp-auto-ads-0.1.js">
</script>
<?php
}

// AdSense追加
add_action( 'amp_post_template_footer', 'xyz_amp_add_tag_adsense' );

function xyz_amp_add_tag_adsense() {
?>
<!-- AMP自動広告 -->
<amp-auto-ads type="adsense"
              data-ad-client="ca-pub-xxxxxxxxxxx">
</amp-auto-ads>
<?php
}
任意の位置(フッターなど)にAMP 対応広告ユニットを追加する方法は過去記事:AMP for WordPressプラグインを使ってAMPに対応した手順をご参照下さい。
基本的には同じやり方です。併用する場合は
functions.php
//Adsense-JS追加
add_action( 'amp_post_template_head', 'xyz_amp_add_tag_adsense_js' );

function xyz_amp_add_tag_adsense_js() {
?>
<!-- AMP Ad -->
<script async custom-element="amp-ad" src="https://cdn.ampproject.org/v0/amp-ad-0.1.js"></script>
<script async custom-element="amp-auto-ads"
        src="https://cdn.ampproject.org/v0/amp-auto-ads-0.1.js">
</script>
<?php
}

// AdSense追加
add_action( 'amp_post_template_footer', 'xyz_amp_add_tag_adsense' );

function xyz_amp_add_tag_adsense() {
?>
<!-- Google Adsense -->
<amp-ad width="100vw" height=320
  type="adsense"
  data-ad-client="ca-pub-xxxxxxxxxxx"
  data-ad-slot="xxxxxxxx"
  data-auto-format="rspv"
  data-full-width>
    <div overflow></div>
</amp-ad>
<amp-auto-ads type="adsense"
              data-ad-client="ca-pub-xxxxxxxxxx">
</amp-auto-ads>
<?php
}
このように書けばOKです。
AMP自動広告は表示されるまで大体30分ほどかかりました。すぐには表示されないのでしばらく待ってから確認してみてください。
参考 AMP 自動広告についてAdSenseヘルプ
